I daresay my deep-freezer may be my most-used appliance, after the stove and fridge. I rely on freezer meals a few times a week to help me get a good dinner on the table efficiently. I almost always have a soup, stew, or chili tucked in there, a few balls of pie crust for a quick weeknight quiche or pot pie, not to mention a batch or six of pulled pork, frozen burgers and enchiladas.
Dedicating a few hours each month to stocking my freezer is one of the best investments I make in preserving my sanity. I live with four boys who eat from sun up to sun down plus a few hours longer and are always in search of their next meal. It would be impossible for me to keep them well fed without a) making a meal plan b) filling a freezer with food and c) cooking once to eat two or three times.
If you’re new to, or even skeptical about, freezer meals I’m making it my mission to convince you they really are the gateway to getting a good dinner on the table with some regularity. Here’s everything you need to know:
Who Are Freezer Meals For?
The answer is: everyone! Stockpiling dinners can save you time and money (halleluiah!) and are particularly handy if you’re a working parent. Despite common misconceptions, you don’t need to have a large family to benefit from making frozen meals; they can serve one or two people just as easily. Freezer meals are also ideal for sharing. I deliver some to my father-in-law almost weekly, but if you know of anyone who is sick, tired, overworked or having a baby, alleviate their stress by dropping off a meal or two for another day.
Tips to Get You Started Making Freezer Meals:
- Invest a few hours one afternoon or evening each week to fill the freezer with healthy meals for your family. As a general rule of thumb, most hearty soups, stews, sauces and casserole-style dishes freeze well.
- If you know you are going to freeze a meal, undercook the vegetables a little so they don’t turn limp (and overcooked) when you reheat the food.
- If a recipe calls for finishing with sour cream, yogurt or cream, wait and add that after the dish has been reheated. Similarly, fresh herbs don’t freeze well so add them just before serving the dish.
- To prevent freezer burn, wrap casserole-style dishes in a double-layer of plastic wrap and then aluminum foil.
- All frozen food should be eaten within three months. It won’t go “bad” if it sits in the freezer for longer, however the taste can be compromised.
- Label the container with the recipe name, date and any cooking instructions (i.e. 350°F for 20 min.)
- When defrosting freezer meals, thaw the food in your fridge for 24 hours or more for best results.
- Freezer meals aren’t just for dinner. You can stuff the freezer with dishes for breakfast; appetizers and snacks; desserts and more.
Suggested Freezer Meal Recipe Ideas:
Each of these recipes can easily be frozen. Make a double or triple batch and put away the extras for future feedings.
- Homemade Frozen Pizzas
- Pulled Pork
- DIY Smoothie Packets
- Mini Turkey Meatball Bites
- Crispy Chicken Cutlets
- Spinach and Ricotta Lasagna
- Pizza Dough
- Turkey Burgers
- Soups
- Chilis
- Stews
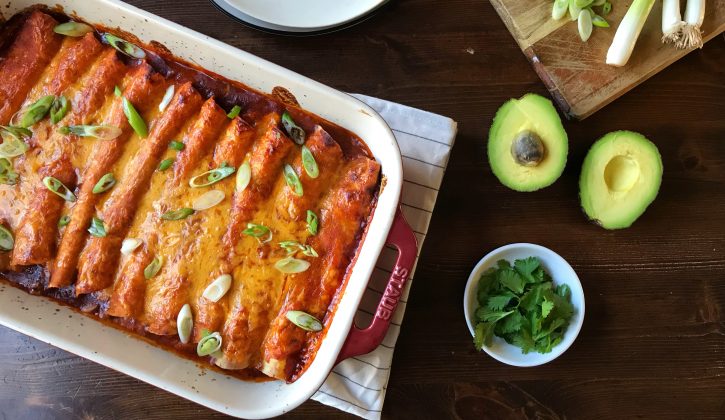
Recipe: Chicken Enchiladas
This is one of my family’s favourite dinners. The method may look lengthy, but I assure you it’s mostly hands-off cooking time. Corn tortillas are more readily available these days, but if you can’t find them feel free to use the flour kind instead.
Ingredients:
- 2 teaspoons canola oil
- 1 medium onion, finely chopped
- 1 jalapeno pepper, seeded and finely chopped
- ½ teaspoon kosher salt
- 3 garlic cloves, minced or grated
- 2 tablespoons chili powder
- 2 teaspoons ground cumin
- 1 tablespoon granulated or cane sugar
- 1 (398 mL) can Hunt’s Heirloom Crushed or Diced Tomatoes or 2 cups tomato sauce
- 1 cup water or chicken stock
- 1 ½ lbs. boneless, skinless chicken breasts or thighs
- 10 corn or flour tortillas (6-inch)
- 1 cup shredded cheddar cheese
- 1 cup shredded Monterrey Jack cheese
- 1 tablespoons olive oil
- Optional garnishes and toppings: fresh cilantro, sliced avocado, crumbled queso or feta, sour cream
Directions:
- In a large saucepan, combine the oil, onion, jalapeno and salt. Cook over medium heat, stirring often, until the onions and pepper have softened, about 8 to 10 minutes. Stir in the garlic, chili powder, cumin and sugar, and cook until fragrant, less than 30 seconds. Stir in the tomato sauce and water. Bring to a simmer.
- Nestle the chicken into the sauce. Reduce heat to low, cover, and cook until chicken is cooked through, about 12 to 20 minutes, depending on the size and thickness of the chicken breasts you are using.
- Meanwhile, preheat the oven to 300°F and brush both sides of the tortillas with olive oil. Place in a single layer on two baking sheets lined with parchment paper. Bake for 3 to 4 minutes or until soft and foldable. Set aside. If making the enchiladas now, increase the heat to 400°F. If freezing the enchiladas turn the oven off (see below for more details).
- Transfer the chicken to a plate and set aside to cool. Continue to simmer the sauce over medium heat until slightly thickened, about 5 minutes. Strain the sauce through a fine mesh sieve into a medium bowl, pressing the onion mixture to extract as much liquid as possible. Season sauce with additional salt and pepper to taste.
- Transfer the leftover onion mixture from the strainer to a large bowl and set aside. Shred the chicken into bite-sized pieces and also add to the bowl. Stir in ¼ cup of the enchilada sauce, and half a cup each of the cheddar and Monterrey Jack cheeses. Toss to combine.
- Spread the tortillas on a clean work surface, and spoon 1/3 cup of the chicken mixture evenly down the center of each. Tightly roll each tortilla and lay seam-side down in a greased 9×13-inch baking dish.
To Make it Now:
Brush the enchiladas with the olive oil and bake for 12 to 15 minutes or until the tops are lightly golden. Pour the remaining enchilada sauce evenly over the top and sprinkle with the remaining cheeses. Cover dish with foil and bake 15 to 20 minutes longer, or until heated through. Remove foil and bake another 5 minutes, until cheese browns. Remove from oven and let stand 10 minutes. Sprinkle with garnishes before serving.
To Make it a Freezer Meal:
Wrap the pan of enchiladas tightly with plastic wrap, pressing down to remove the air. Cover with foil. Pour the remaining enchilada sauce into a freezer bag and seal, removing as much air as possible. Place the remaining cheese in a second freezer bag and seal, also removing as much as possible. Place the freezer bags on top of the pan and wrap once again in a layer of foil. Label and freeze.
To cook from frozen, following instructions above. Thaw the enchilada sauce by running the freezer bag under hot water or microwave in a microwave-safe bowl for 1 to 2 minutes. Break up the frozen cheese with your hands and scatter over the enchiladas. Add an extra five minutes to the second bake time and proceed with the recipe as written.
Tagged under: easy recipes,dinner recipe,chicken enchiladas,Mexican recipes,weeknight dinner recipe,family weeknight dinners
Category: recipes,dinner,food,make-ahead


